* FEATURES
Everything in the box
A guided tour of Retro Commander 1.0 alpha, top to bottom. Most of it works standalone on any Windows PC - the live Ultimate features are the bonus on top. Skim it, or use the side index to jump straight to a section.
Dual-pane file management
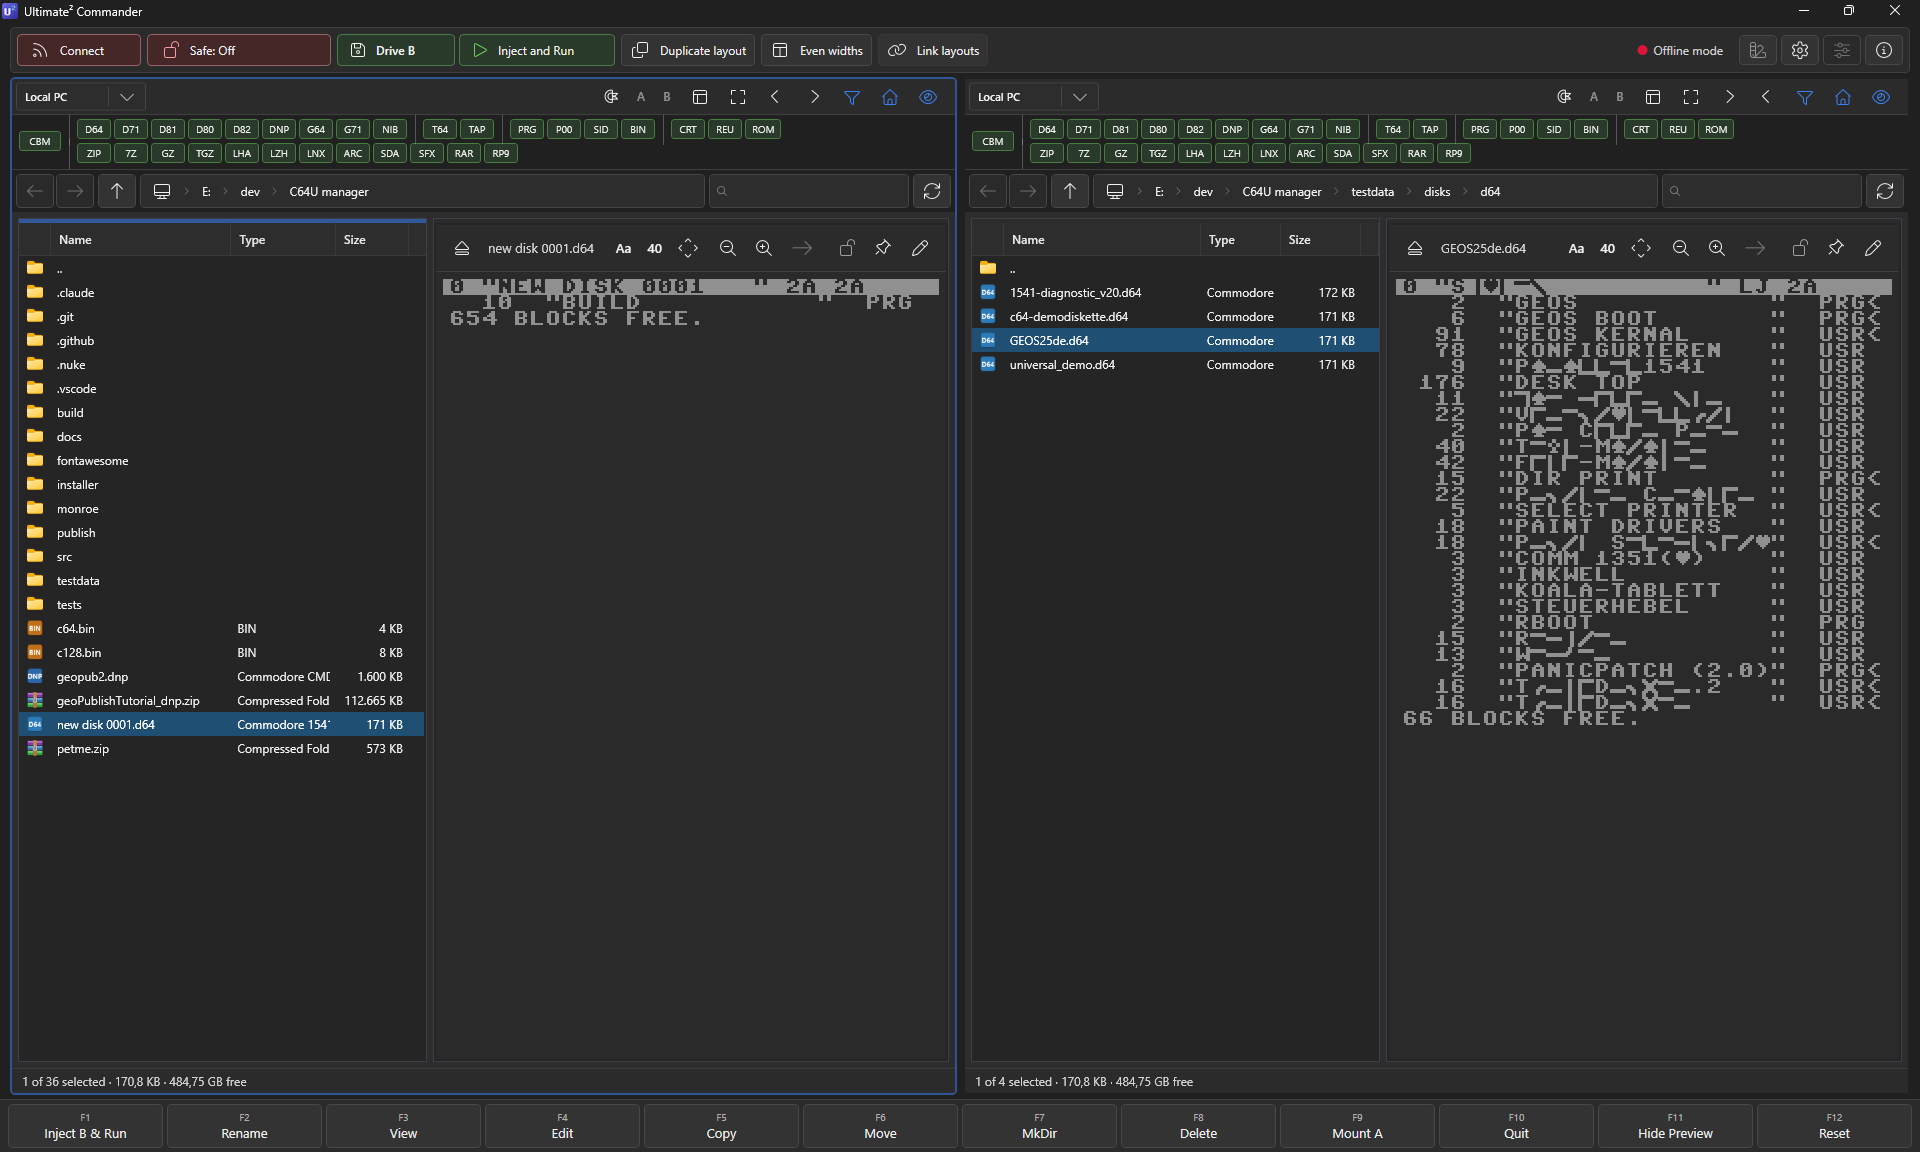
A Norton-style, Star Commander style two-pane layout puts your local PC on one side and a second folder, an open disk image, or - if you have one - your Ultimate's filesystem on the other. The active pane is highlighted with a customisable focus ring; Tab swaps focus, every F-key acts on the active pane.
- Drag-and-drop between panes - and to and from Windows Explorer, straight into a disk image.
- Copies say where they land: F5 and F6 show From and To before anything is written, and the source and target panes are framed.
- A copy that won't fit on the disk is stopped before a byte is written, with Copy what fits as a way out.
- Per-pane home folder so each side starts where you actually work.
- Column visibility (Type, Size, Modified, plus load address and start track/sector inside a disk) - toggleable.
Single-screen mode
Maximise one pane and work between its two halves: browse your collection in one, keep the disk you're filling in the other, and flip between Browse and Work with Ctrl+M. It's built for the classic Commodore workflow - compiling your own collections, like a music disk, a demo disk or a best-of, from many sources at once.
Big archives list without waiting, so you can step through source disk after source disk and F5 each file straight across - no endless mount / unmount cycle while you fill one big disk.
Live disk-image editing
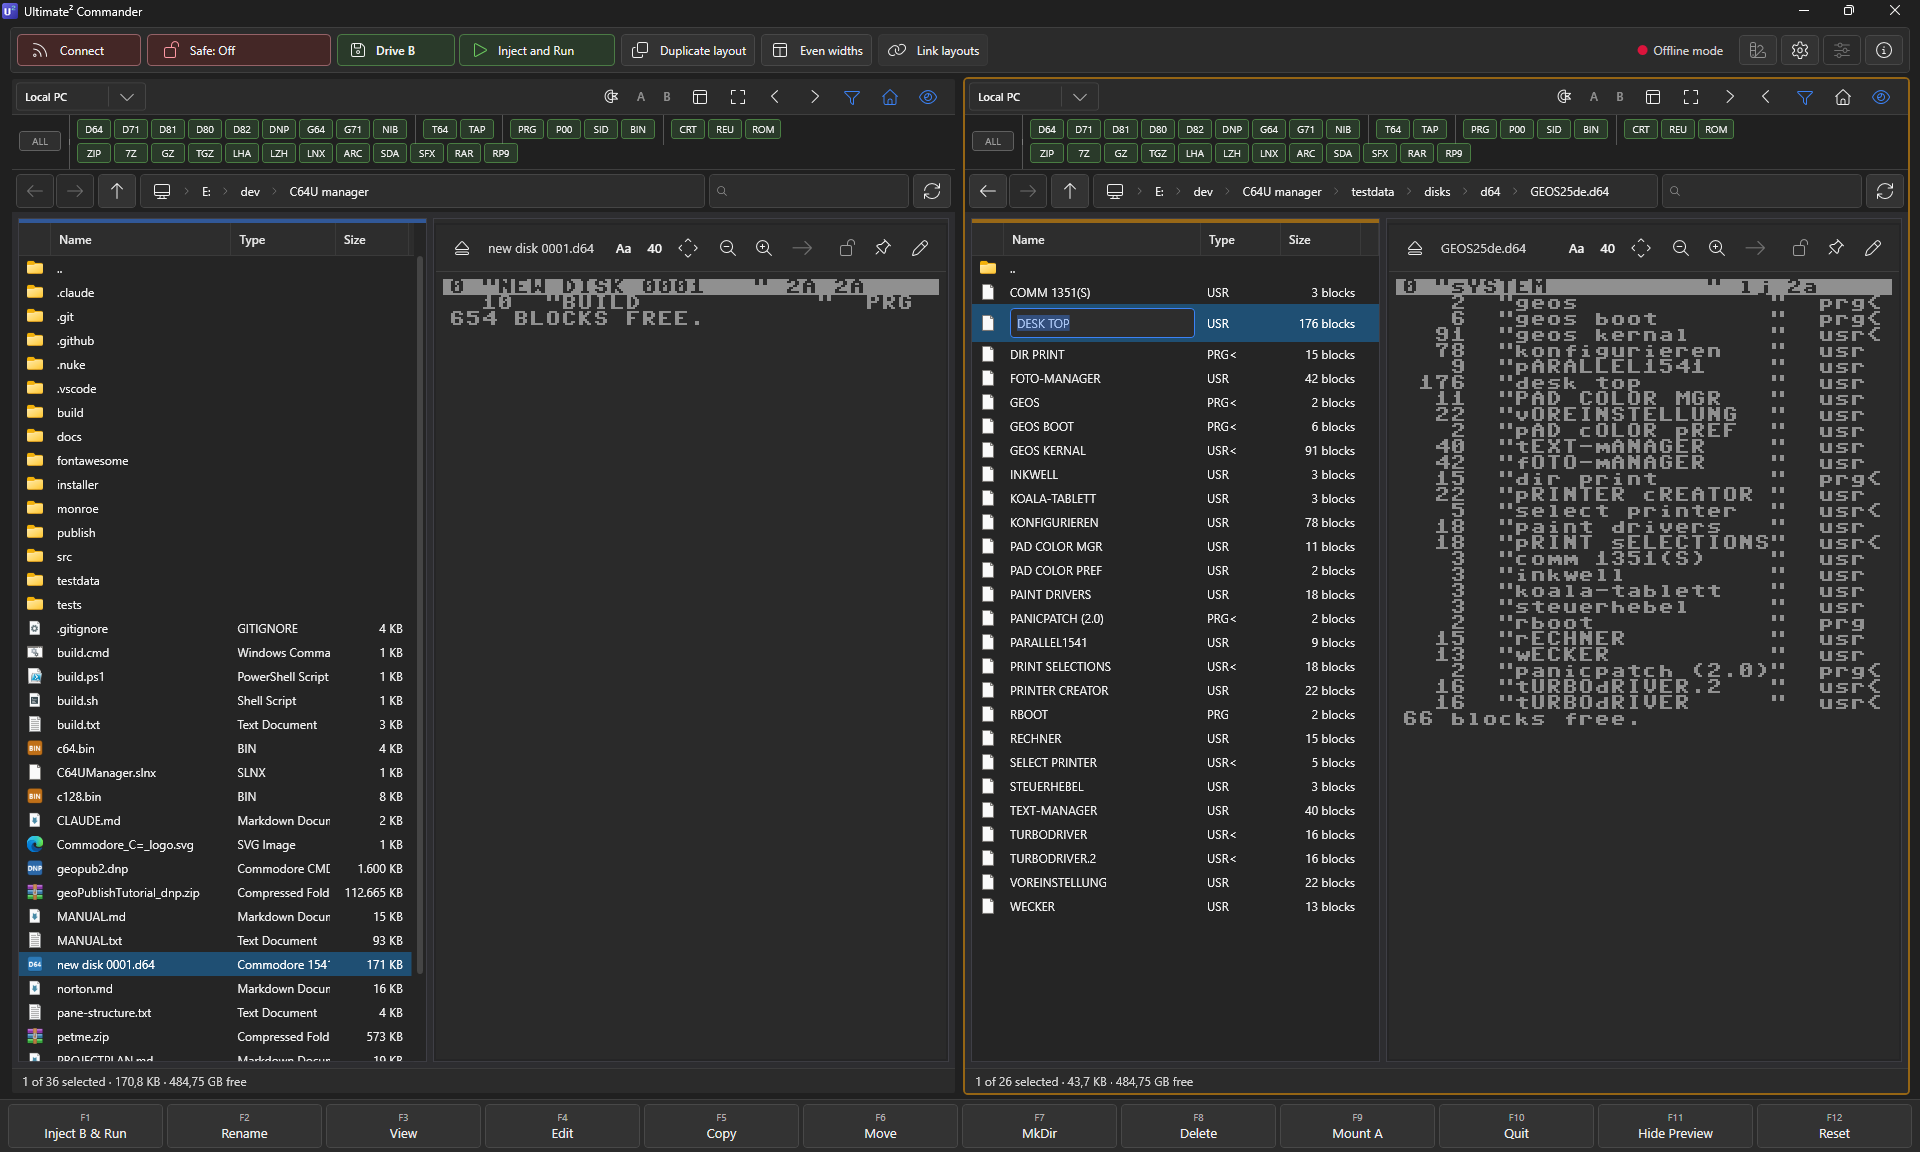
Open a .d64, .d71, or .d81 and it behaves like a folder in the pane. No extract-edit-repack cycle, no temp files, no separate "disk tool". Every operation you already know from Norton / Total / Far Commander works directly on the entries inside.
Files from Windows Explorer or the other pane land inside the open disk. Multi-select supported.
Drag entries straight to your desktop, the other pane, or another open disk. Bytes copy on drop.
Inline editor opens on the entry. Right Alt acts as the Commodore key for PETSCII characters, Ctrl+Space opens a PETSCII picker.
SCRATCH the entry from the BAM, blocks return to free, no quirks.
Auto-suffix in the Star Commander spirit:
GAME gets a .001 copy, fitting the disk's 16-character filename rules.Open two D64s in left and right panes, F6 moves an entry from one to the other.
Reorder entries with Ctrl+Up/Down, lock or splat a file, change its type, edit block counts, add separator rows.
Make folders inside D81 partitions and DNP images, and step in and out like any directory.
All writes happen on the real disk image bytes via the in-house CBM filesystem layer (D64 - including the 40-track DolphinDOS / SpeedDOS / PrologicDOS variants - D71, D81, D80, D82 and DNP all support write; G64 and T64 are read-only). Ctrl+Z undoes up to 64 steps - copies, moves, renames, deletes, stamps, even a BAM repair - and Ctrl+Y redoes a disk edit.
Safer edits. A disk that was changed outside the app (say, by an emulator) is detected and reloaded instead of overwritten, saves are all-or-nothing, and a disk attached in VICE can still be saved. Safe Mode gates writes if you want to browse without risk.
Show deleted, restore
Switch on Show deleted and scratched files appear in the listing, dimmed. Pick one and Restore as PRG, SEQ, USR, REL or CBM brings it back - in D81 partitions and subdirectories, for scratched partitions, and for GEOS files too.
Restoring is an ordinary edit, so Ctrl+Z takes it back if you picked the wrong one.
CBM disk & tape formats - read, write, create
Open the standard CBM-DOS images and the more exotic ones, then browse them like folders.
The D64 reader also handles the 40-track speeder-DOS layouts - DolphinDOS, SpeedDOS and PrologicDOS. A G64 is decoded track by track so you can browse it and copy files out; sectors that can't be read are counted and named instead of silently skipped.
Archive formats - a dozen, browseable like folders
Archives open inline as if they were folders. Step into a .zip with Enter, find a .d64 inside it, step into that, run the .PRG - no extract step, no temp files visible to you.
* C64-SCENE ARCHIVES
- T64 · tape image as a PRG container
- LNX · Commodore Lynx archive
- ARC · SEA ARC, all six modes
- SDA · Self-Dissolving Archive
- SFX · Self-eXtracting LHA
* PC ARCHIVES
- ZIP read + write
- RP9 · RetroPlatform package read + write
- GZIP / TAR · .gz, .tar, .tgz, .tar.gz
- LHA / LZH · -lh1- + -lh4..7-
- RAR · RAR5 (and RAR4)
- 7-Zip · LZMA / LZMA2 / Deflate
ZIP and RP9 can be changed in place - add, update, delete, rename - with a .bak-rollback safety net. The other formats are read-only: open them, run the contents, copy entries out.
Find in disks & favourite folders
Ctrl+Shift+F searches inside your disk images - including D64s packed in .zip, .7z and .rar, D81 partitions and DNP folders - and can match a disk by its name or ID. An archive that takes too long is skipped and counted, so a search never hangs on one slow file.
Ctrl+Shift+D remembers the place you're in - a PC folder, a folder on the Ultimate, even a spot inside a disk or zip - and Ctrl+D takes you back to any of them.
Stamps
Select a block of directory rows - a separator, a logo, a header - and Make stamp saves it to your library. Ctrl+I opens the library and inserts a stamp into any disk; Ctrl+Shift+I drops the last one in again.
Or draw your own: the stamp editor works in the C64 font, with pen, eraser, text, lines and rectangle frames that join up neatly. A Dir-Master list can be imported as a stamp too.
A look under the hood
F4 opens the Disk Inspector for the selected image: a disk report, a BAM check that can repair what it finds, and a BAM / sector map of every track. Click a sector to see it as hex and PETSCII, and follow the link to the next sector in the chain.
In the listing itself you can switch on the load address and the start track/sector of every file. Shift+F3 opens any file in the hex viewer, whose glyph column switches between PETSCII, screen codes and ASCII.
Three ways to launch a PRG
Press F1 on a .PRG (or a PRG inside a D64) to run it the default way - the key bar tells you what will happen, e.g. Load A & Run. Hold a modifier to pick a variant on the spot.
| Mechanism | What it does | Use it when |
|---|---|---|
| Mount A | Mounts the parent disk image on drive A like a real 1541. The default. | Multi-load games and disk-heavy software. |
| Mount B | Same, on drive B. Keeps drive A free for another disk. | Two-drive setups and side-B operations. |
| Inject | Sends the PRG straight into RAM via the REST API. | Fastest. No drive state changes. |
Shift+F1 runs from the other drive, Alt+F1 loads without running, and F9 / Shift+F9 just mount a disk on drive A or B. Each launch can be paired with a pre-reset: None (safest default), Hard reset, or Reboot Ultimate (gated behind a setting because it ends any running session).
No Ultimate? Pick an emulator as the launch target - VICE, Denise, Hoxs64 or CCS64 - and F1 starts the file there instead. SID and Sidplayer .mus tunes play the same way, on the Ultimate or in an emulator. The full launch guide →
Inline PETSCII directory preview
Land on a D64 and its directory renders in proper PETSCII next to the list, in the C64 font - no need to open it. F11 shows or hides the preview; in Settings it sizes to Off, Half, Mid (75%) or Full so it fits wide and narrow layouts. A tap of Ctrl+Shift switches the PETSCII character set, just like on the real machine.
Device discovery
On first start with no address set, Retro Commander looks for an Ultimate on your network by itself. Or click Scan on the Connection tab of Settings: it probes TCP/80 across your subnet and confirms each hit over the REST API, typically in a second or two. No need to remember IP addresses or fish them out of your router.
And discovery is just the doorway. Once connected you can edit a D64 that lives on the device in place, read its status and full configuration, reset, reboot or power it off, and play SIDs on the real chip. See the full Ultimate guide →
Offline mode
A master kill-switch in Settings ▸ Connection that suppresses every device-side network call: no REST probes, no FTP login, no heartbeat, no auto-discovery. The app starts and runs as a plain dual-pane local file manager.
Useful on the road, when the C64U is powered off, or when you just want to organise files without any background chatter.
Five-level Safe Mode
One chip in the toolbar, five protection levels: click it and pick a level from the menu. Choose the lowest level that prevents the mistake you're worried about today.
- 1 · Off - nothing protected.
- 2 · Images - writes inside opened CBM disk images blocked.
- 3 · C64U - writes to the Ultimate blocked.
- 4 · Images + C64U - both of the above.
- 5 · All - also blocks writes to the local PC filesystem.
Layout & focus ring
Shift+F11 cycles the pane layout, F11 shows or hides the preview, and Ctrl+U cycles which panes are visible - or go all in with single-screen mode.
The active-pane focus ring is yours to tune, per pane: colour, hue, saturation, brightness and opacity - so the active side is always obvious at a glance, in the app's dark theme.
Keyboard-first
An F-key bar at the bottom mirrors classic Norton/Total Commander muscle memory. Modifier keys pick variants without taking a hand off the keyboard.
| Keys | Action |
|---|---|
| F1 | Run with the default mechanism |
| Shift+F1 | Run from the other drive |
| Alt+F1 | Load only (no run) |
| Ctrl+F12 | Hard reset, then run |
| Tab | Switch active pane |
| Ctrl+M | Single-screen mode: flip Browse / Work |
| Ctrl+Shift+F | Find in disks |
| Ctrl+D / Ctrl+Shift+D | Go to a favourite / add this place |
| Ctrl+I | Stamps |
| Ctrl+C / V / X | Standard Windows clipboard semantics |
| Ctrl+Z / Ctrl+Y | Undo / redo |
Full cheat-sheet: Keyboard shortcuts in the documentation.
Installer or portable?
Installer (~5 MB)
A start-menu entry, an optional desktop shortcut and optional file associations for D64, D71, D81, D80, D82, DNP, G64 and T64.
Installs for everyone on the PC, or only for you.
Portable zip
One RetroCommander.exe in a zip. Unpack it anywhere - a folder, a USB stick - and run it.
Nothing to install, no runtime needed.
Both are the same native app for Windows 10 and 11 (x64). Settings live in a settings\ folder next to the .exe when that folder is writable, otherwise in %APPDATA%\RetroCommander. Alpha builds carry an end date; a newer build is on the download page before then.
Curious who builds all this, and why? Read the story behind Retro Commander.